Monday, July 11, 2011

Patio upgrades!

I’m going to begin this post by not acknowledging the fact that it has been (ahem) well over a month since I last updated! Let’s just move right along, eh?

Summer is in full swing and it has been a very eventful one already for the folks at Casa Lucy. I got a new job (another one!) and started just a few weeks ago. It’s been awesome being back in the publishing world. Branden got yet another motorcycle (that makes two motorcycles and two motorbikes in the garage, in case you’re counting. I am.) but very unfortunately fractured his patella when he was run off the road by a terrible driver who ran a stop sign. So since he’ll be in recovery for the next 8-10 weeks (ugh), projects around the house have slowed considerably. I’m just relieved that nothing worse happened… thank god for helmets!

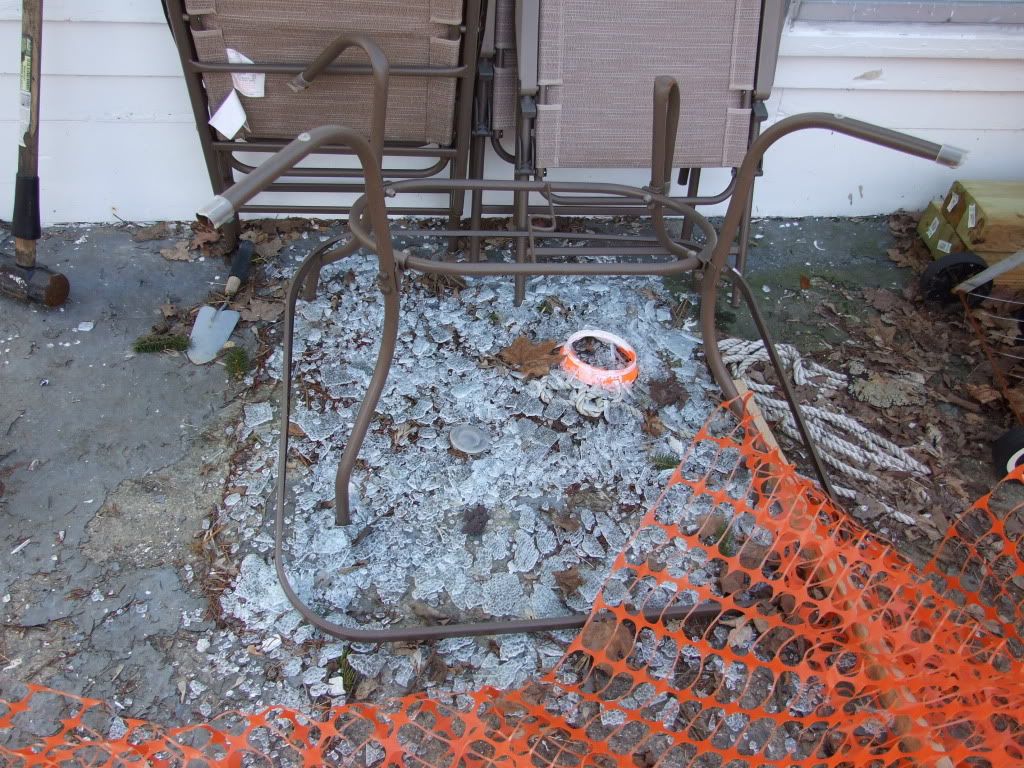
As a birthday gift, Branden’s grandmother so generously got us a new patio set for the backyard. As you’ll recall, our last table shattered in the Great Ice Collapse of 2011:


I had been eying this Martha Stewart set (fancy!) at the store for a while but it was muy expensive-o. It went on clearance at Home Depot but the two closest stores were sold out. Luckily we were able to snag one of the very last sets a couple of towns over!

I absolutely love our new set. It’s a huge upgrade and was worth the drive to get it!


Photobucket


The cushioned chairs are really comfortable and the table is large enough that we’ll have plenty of room for entertaining. We had such a hard time trying to cram people around our old square table. Having this much space has been great. It's a definite "grown up" set. And since the table is much wider, we’re able to put food in the middle and it’s luckily out of Lucy’s reach! 

This patio area had gotten pretty neglected after the winter and was looking rather sad. It was time to spruce it up! After a major cleaning, I picked out some annuals in vibrant colors along with two extra large planters.
Photobucket

I mixed the different flower types in each planter. I just love how bright and happy the colors are!

Photobucket


Photobucket


These planters definitely added a much-needed punch of color out here.


Photobucket


Photobucket


We would love to do a full overhaul of this patio (probably involving a backhoe, seriously) and put down some nice brick pavers or something better than cracked concrete with chipping paint on top. Ugh, I hate it. BUT, that’s a bridge that we can’t quite cross yet, so for now we’re going to have to deal.


It's been incredibly hot the last week or two (temps in the 90s pretty much every day!) so we've been trying to enjoy the sunshine on the patio but it's been tough! Lucy would much, much rather melt into a puddle in the air conditioning...
Photobucket

Thursday, May 26, 2011

Sing me a song, piano man

Earlier this week we got a very exciting delivery for our living room...

Photobucket


...a player piano!

The piano belonged to Branden's grandmother and she passed it down to him. For years it sat at his dad's house, since he had no place for it to go. It finally made its way to the house and now fits perfectly in a corner of our living room!

Photobucket

It really classes up the joint. We used to have a desk with a computer over in that corner. Since we got a new laptop, we moved the computer up to the desk in the now-empty office (since I no longer work from home the office wasn't getting much use anymore).

I start grad school next week (yup, I'm getting a Masters of Education in Secondary English... not sure if I'm ready to write papers again but here goes nothing!) so I'll be using the computer in the quiet office to do homework very frequently, I'm sure.

I'm kind of amazed by how well the piano fits in the living room... it's almost made for it!

Photobucket

While it's a little out of tune, it's definitely still able to played. Branden has been working on the mechanics for the player part (you can see the tools in the shot above) and it's almost working 100%. For now, you have to stick some tweezers into the tape deck to keep it playing. :)

Photobucket

I'll have to take a video of the player piano in action and post it... we've been playing a tape of ragtime favorites and I'm pretty sure that the neighbors think we're operating a speakeasy. It sounds like a saloon up in here.

It's always refreshing to do a little reshuffling of furniture. To free up some space next to the piano, we swapped out an end table with one from the dining room and rearranged the table in that room (I'll post some pics of that soon). It's amazing what switching some things around can do to make a room feel fresh.

We also picked up a new pair of table lamps a month or so ago at Homegoods. They were only $30 each, with the lampshades. Love them!

Photobucket

They kind of remind me of spinal cords... in a good way? Each level has a pinkish/red ring painted around it, which matches the couch perfectly. It alllll comes together.

Photobucket

Lucy likes the new lamps, obvs.

Back to the piano, when I sat down at it I definitely needed some time to remember which keys were which. I hadn't looked at sheet music since I graduated college, so I was a little rusty! It's amazing how it all comes back to you though after just a few minutes of playing.
 
Photobucket

I'm really loving having it in the house, and find myself sitting down to practice for a bit each day. Maybe by Christmas I'll be able to play carols and we can all sing around the piano like in Little Women!

Sunday, May 15, 2011

kitchen planning

As I mentioned earlier, we've started planning our kitchen renovation in earnest now. Before we start demolishing the current kitchen, we need to finish the laundry room in our basement and reroute the hookup for our dryer (which currently lives in the mudroom off of the kitchen). The laundry room is almost completely finished now--we just have to prime and paint one more wall and install some partition doors--and the electrician will be coming next week to set up the dryer. After that we'll be all set and ready to get moving on this new kitchen!

Here is the floorplan of the kitchen, as it currently stands:

Photobucket

It functions very poorly. The stove is situated between two doorways, with no countertop on either side. The fridge is on the other side of the room, again with no nearby countertop for setting things down.

Our plan is to knock down the wall between the kitchen and mudroom and expand the kitchen into that whole space.

We've come up with two options so far for the kitchen layout.

Option #1:

Photobucket

In this option, the area where the fridge currently is will become a breakfast nook. We'd love to have a built-in banquette here, which is what those benches represent in the floor plan.

Here are some more views of Option #1:

Photobucket

Photobucket

Photobucket

I would love to have a vintage farmhouse table that can also be used as extra prep space. Option #1 would be the most open and airy.

Option #2, however, would include adding a half bathroom. Our house only has one bathroom currently, and it's located upstairs. Adding a second bathroom, on the main floor, would be so much more convenient and would definitely add value.

Here's the floorplan for Option #2:

Photobucket

The half bathroom would be added in place of the breakfast nook in Option #1.

Some alternate views of Option #2:

Photobucket

Photobucket

This option would make the kitchen less open, but having a half bathroom on the main floor would be a huge improvement.

Both options have their benefits, so we have a tough choice ahead! I'll post some pictures of the finished laundry room soon!

Friday, May 6, 2011

Green thumbs and blue hydrangeas

The last couple of weeks, we've continued work on the front gardens. There's been lots of weeding, raking, shoveling dirt, spreading dirt, digging holes, planting, packing dirt, watering, mulching... you get the picture. It's dirty and tiring work, but I've found that I actually enjoy it a lot.

One of my favorite flowers is the blue hydrangea. I love the giant clumps of bright blue blooms that I see all in front of people's homes all summer.

Usually, the hydrangea bushes I see are 4 or 5 feet high, with flowers practically pouring out of the foliage.
Because I love them so much, I bought three blue hydrangea bushes for the new garden bed in the front of the house.

Photobucket

Now, because I couldn't conceivably spend $80 on each 4-foot high bush (!), I had to instead spend $30 on three much smaller, 2-foot high bushes.

Photobucket

I know, I know. They're pretty dinky right now. I just hope that they fill out and grow. And who knows, in 10 years they may end up as high as the porch and be the envy of the neighborhood. Gotta start somewhere, I suppose!

We also snagged a few phlox plants for in between the bushes. Phlox is a ground covering perennial, so the idea is they'll expand over time. We're going to pick up a few more to continue them down the rest of the garden.

We still have to mulch this front garden. We also need to finish laying the edger stones around the curved corner. You can see where we've laid some grass seed as well in front. Since the size of the new garden is smaller than what was there before, we're hoping to get some grass growing in that dirt.

Photobucket

Behind the hydrangea bushes, closest to the porch, we want to plant a row of taller boxwoods. This will give us some greenery year-round, and will be relatively easy to maintain. Just some trimming to keep their shape. Plus it will create a nice tiered effect, with a row of boxwoods, stepping down to the hydrangeas, and then down to flowers at ground level.

In the side garden, the planting is finished for now and we've got everything mulched.

Photobucket

We planted some more phlox, along with one azalea bush in each bed.

Photobucket

The bush towards the forefront that looks like it's dead is a dormant blue hydrangea that's just beginning to bud. This one I purchased at a local greenhouse (and spent a bit more on it)... it's guaranteed to bloom continuously through late summer. I'm curious to see how this particular variety does compared to the three in the front of the house.

The lower garden has an azalea bush flanked by a couple more phlox.

Photobucket

I'm looking forward to seeing how these plants last through the season. I'm going to keep an eye out for some summer and early fall bloomers to add to the gardens, so that there is something flowering all the time.

In other house news, after discovering some major wood rot in one of our kitchen windowsills, the time has seriously come to begin moving forward with our complete kitchen renovation. I'm already overwhelmed by the thought of how complicated (and expensive!!) this reno is going to be. For now we're stuck with the incredibly fun task of researching contractors and comparing bids... I'll post more on the details soon!

Sunday, April 17, 2011

Stump tuggin'

We continued the front garden project that we started yesterday, and we've made some great progress!

First, we finished building the second tier of the side garden. We dug out some of the slope and stacked two rows of stone pavers to create a retaining wall. Then we capped them off with a row of edgers.

Photobucket

I'm really happy with how this wall turned out! (I picture planting some phlox or something similar so that the flowers drape and pour over the wall.)

As often happens around here, our plans then took a little detour and instead of planting and mulching, we decided to rip out all of the dead stumps and dying bushes from the front of the porch.

The previous owners left behind a few unsightly stumps in the front yard.

Photobucket

Not pretty.

After looking at them for the last 10 months, we decided it was definitely time for them to go.

Photobucket

Luckily, we had a pickup truck, chain, and the help of our bff Josh. It was time to tug out some stumps!

Photobucket

After wrapping the chain around the stump, all it took was backing up the truck and the stumps came up pretty easily.

Photobucket

After the old stumps were out, we turned our attention to the half-dead, awkwardly placed evergreen and rhododendron bushes.

Photobucket

We figured while we were tuggin' stumps, we might as well give everything the heave-ho. Those two bushes came out pretty easily, and the change was already huge.

Photobucket

We were left with quite a mess, though. The back of the bushes had apparently been a dumping ground for random garbage. We found everything from an old diaper (seriously, one of the grossest things everrr) to a 3-foot long iron spike.

Photobucket

Some raking was all it took to get the area back in shape. After we had it cleaned up, we got out some twine and stretched it across to get a straight line.

Photobucket

Once we had the twine set to use as a guide, we started laying in the edger stones along the perimeter of the new garden bed.

Photobucket

We then implemented the very scientific method of standing on the stones to level them.

Photobucket

This was followed by the equally technical process of hitting the stones with a hammer to get them in line.

Photobucket

We ran out of edgers just before we could complete the border, but we laid out what we had leftover to get an idea of the end result.
Photobucket

After just a few hours of work today, the change to the front of the house was already pretty tremendous!

Photobucket

And because you know I can't live without a good before and after, let's take a look at where we're at now...

Before:
Photobucket

And after!!:
Photobucket

I'll be sure to keep ya'll updated when we get to planting. Anyone have recommendations for low-maintenance plants that do well in part sun/shade??

Saturday, April 16, 2011

Spring cleaning!

It's been a while! Things have been so busy lately, between my starting a new job to stuff around the house, that I haven't had time to post anything. It's not that we haven't been doing anything though!

We're into April now, and after a seemingly endless winter, the enormous mountains of snow in the yard finally melted away. We've spent the last few weeks cleaning up the back and front yards from the mess of winter, raking leaves, picking up sticks, trimming hedges, etc. We filled about 60 paper leaf bags with yard waste!

This week, we turned our attention to the gardens in the front of the house. First, Branden dug out a garden on the side of the porch.

Photobucket

Then he laid and buried a pipe to direct water away from the house. The pipe was covered with rocks to help with irrigation.

Photobucket

We took a trip to Home Depot (where else??) and picked up some pavers, edgers, and a couple of new bushes.

Photobucket

We added the edger stones to the garden border. The larger paver stones we added to the front of the garden as a retaining wall, keeping the soil in place. Since the yard slopes so heavily, we're building a couple of levels of garden beds, held in place with the paver stones.

Photobucket

I picked out two azalea bushes and a blue hydrangea, which is my absolute favorite!

Photobucket

We picked up more edgers today and plan on continuing the stones all around the front of the porch. The plan is to lay the rest of the edgers, plant the shrubs, and spread the mulch tomorrow. It's going to make such a huge improvement to the front of the house!

We've also been making smaller changes around the backyard. Remember when we had hundreds of pounds of ice blocks fall from the roof onto our glass patio table and grill? After the snow melted, we were left with this mound of shattered glass:

Photobucket

The glass luckily stayed pretty contained in the snow and ice, so we were able to clean up the mess pretty easily. We discovered that our grill had also suffered a similar fate:

Photobucket

Since we love having backyard barbeques, Branden headed out to Home Depot and came home with a shiny new replacement:

Photobucket

We've already used it quite a few times this year! Gas is so much easier to work with than charcoal... I don't think we'll ever go back. We're still on the lookout for a new patio table though!

For the last couple of months I've been dreaming of having a fire pit in the backyard. I love roasting marshmallows, making s'mores, and just sitting around a fire on a summer night. So this week while I was at work (and Branden was home on vacation) I came home to find this set up in the backyard:

Photobucket

I want to get some low, comfy Adirondack chairs so we can lounge around the fire all through the summer. Can't wait!

I'll post more pictures of the garden process soon. It's so nice to be able to get outside in the sunshine and get our hands dirty again!