Showing posts with label biting off more than you can chew. Show all posts

Wednesday, November 2, 2011

Siding is complete!

Things have been pretty busy the last couple of weeks, with traveling for work, a freakish blizzard in OCTOBER (which dumped about 6 inches of snow on us), and other life stuff I haven't had much time to post any updates. Plus, progress has been much slower than we hoped lately, and we've been a bit more frustrated with each day that passes. Contractors, grr!

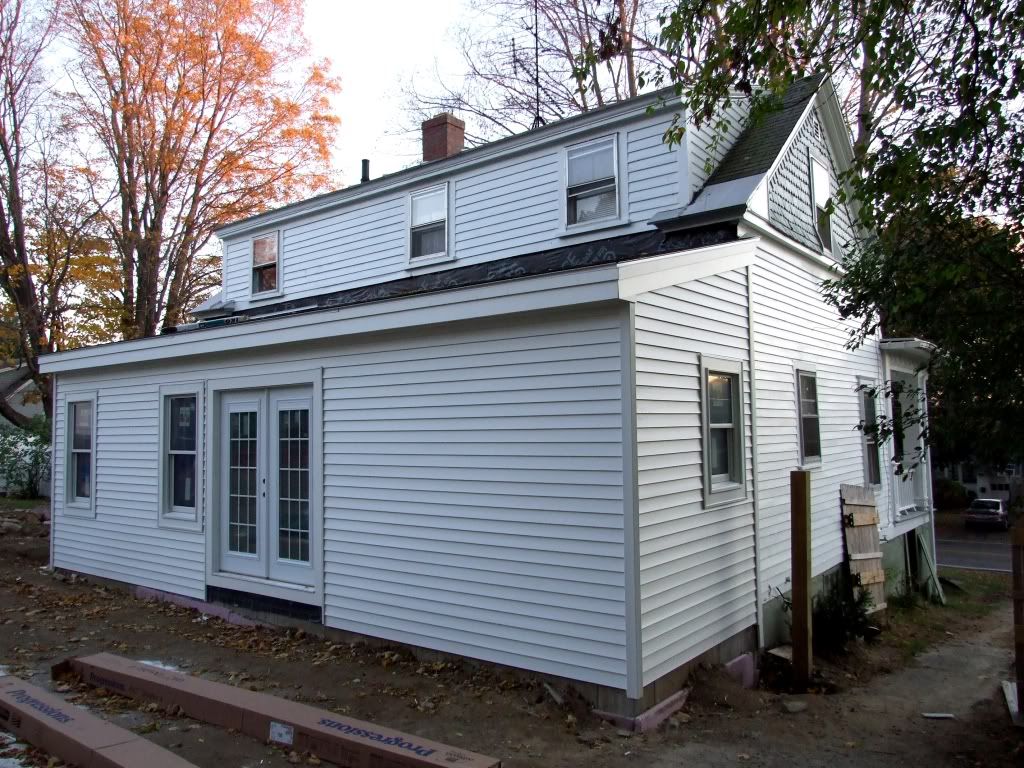
After the framing was completed (which I showed here), the French patio doors and new windows were installed. We were very particular about the type of door that we got, and we're happy with the decision so far.


This particular model has grates inside the glass as well as blinds that are able to open and close, and be completely raised or lowered. Awesomeness. Since the neighbors' backyard abuts ours, having that privacy option in the back of the house will be huge!

After the windows were in, the siding began to go on.
The new windows were trimmed out as well, to make them more similar to the existing window frames on the rest of the house's exterior. The soffits were installed beneath the roof to ensure we don't have issues with drainage or ice dams/icicles:
I'm honestly so pleased with the way the siding came out. It lines up near perfectly with the old siding, and you can hardly tell that there is any difference.

The new siding is vinyl, while the old stuff is (aged) wood. You can only see the difference close up, and even then it's pretty minimal.
The crew did a great job of lining the boards up so it's almost seamless. I had envisioned the new space looking like a super noticeable add-on, but we think it actually looks like it could've been part of the house all along!


Beyond the windows and siding getting installed, the plumbing for the new bathroom is roughed in and ready to be finished off. We bought a bathroom vanity and faucet a couple of weeks ago, which has since been sitting in the middle of the kitchen (naturally).

On Monday our new fireplace was delivered, and is now also sitting in the middle of the kitchen (again, natch). We decided to go with propane as a heat source, since digging a line to the street for natural gas was going to cost literally thousands of dollars. With propane, we can stick the tank way out behind the detached garage (I was worried that it would have to sit in the backyard like an eyesore) and run a line to the house for a few hundred bucks instead. So, that was the winner! Running the propane line will be one of the last parts of this whole job, but I can't wait until it's all hooked up and keeping us toasty warm this winter.

This week the crew started framing out the interior walls (which I'll take pictures of when it isn't pitch black dark!) and started breaking through to the inside of the house. We're meeting with the electrician tomorrow night to map out where all of our outlets and light fixtures should be, which is exciting. Picking out spots for fixtures makes me feel like we just might be rounding the corner towards the finish line here.

The original timeline was supposed to have work wrapped up by the end of October. Here we are in November with so much left to do. It's frustrating being powerless in this situation... we can't force our contractor/the crew to go any faster, and certainly don't want to burn any bridges or cause them to do bad work by making a stink. They know we're losing patience with the pace of the project (especially as it's getting increasingly colder outside, and we've got several inches of snow in our still-yet-to-be-graded backyard) but there's not much else we can do. Fingers crossed that we're actually finished by Thanksgiving!!

Saturday, September 3, 2011

Always expect the unexpected

I’ve been avoiding writing this post because I needed several days to digest and process my thoughts. I still don’t think I can accurately communicate the gravity of the situation we’re faced with currently but I'll do my best.

The title of this post is advice that we should have taken to heart when we began this kitchen/mudroom renovation. We’ve been down this road before and we know that plans can change in an instant when you're dealing with an old house. When we bought the house, we had started out thinking that we could do the work ourselves, stripping wallpaper and making upgrades. Once we got in and realized how time-intensive it would be and how damaged the walls really were, we hired professionals to come in and replace the walls and ceilings entirely throughout the house. It altered all of our plans and became a more extensive renovation than we had anticipated.

So when we began this next renovation phase, removing part of the house, expanding the kitchen, etc., we should have kept that experience in mind. We should have known to expect the unexpected. Because you never know what you’re going to encounter when you start digging into things. But we didn’t remember. And we were blindsided by what we are now faced with.

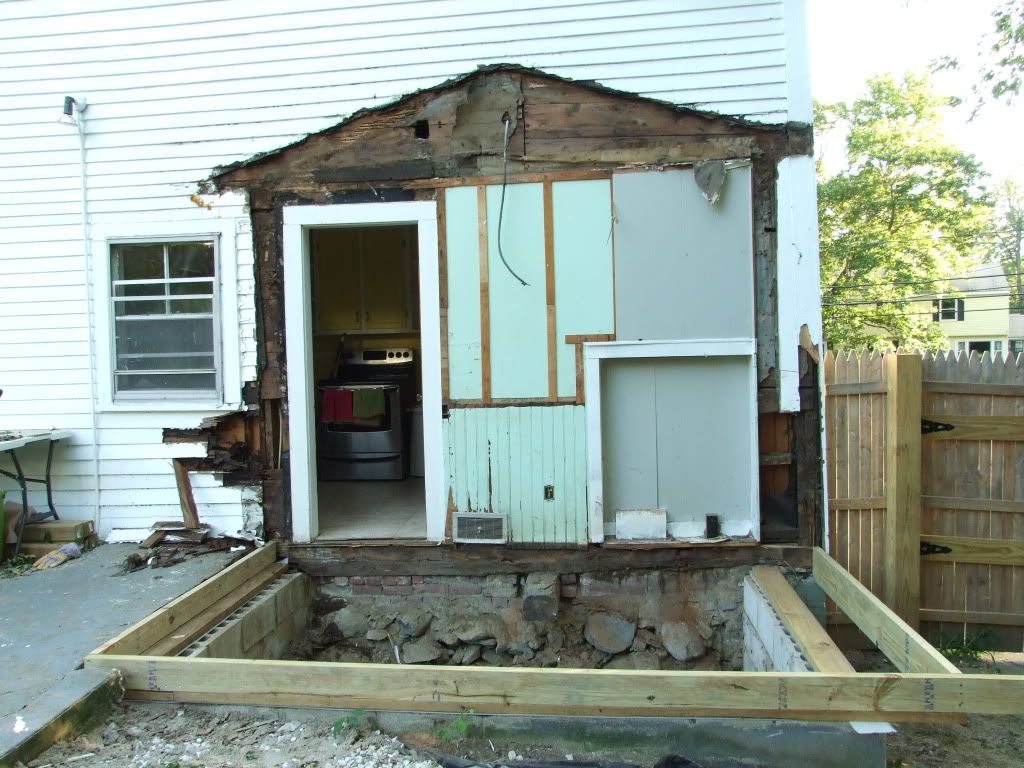
When our contractor began this project earlier this week,  his crew pulled down the mudroom the first day. As they began removing the structure and pulling down the siding, he encountered an enormous problem. A huge, devastating problem.


Our house is rotting.

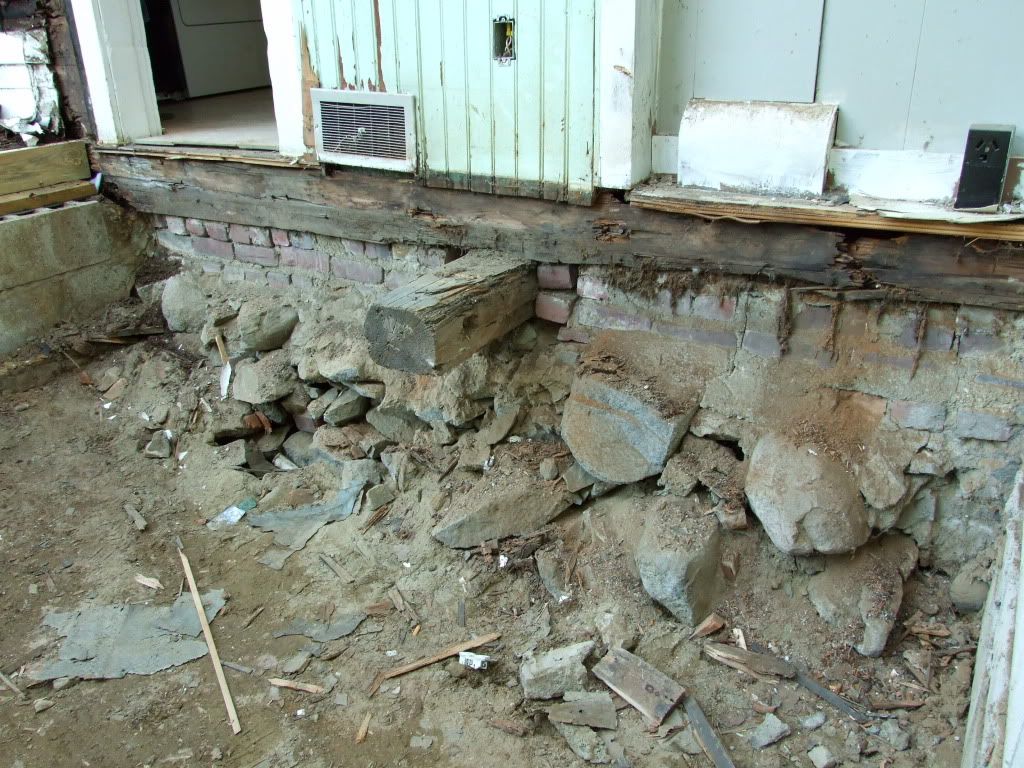
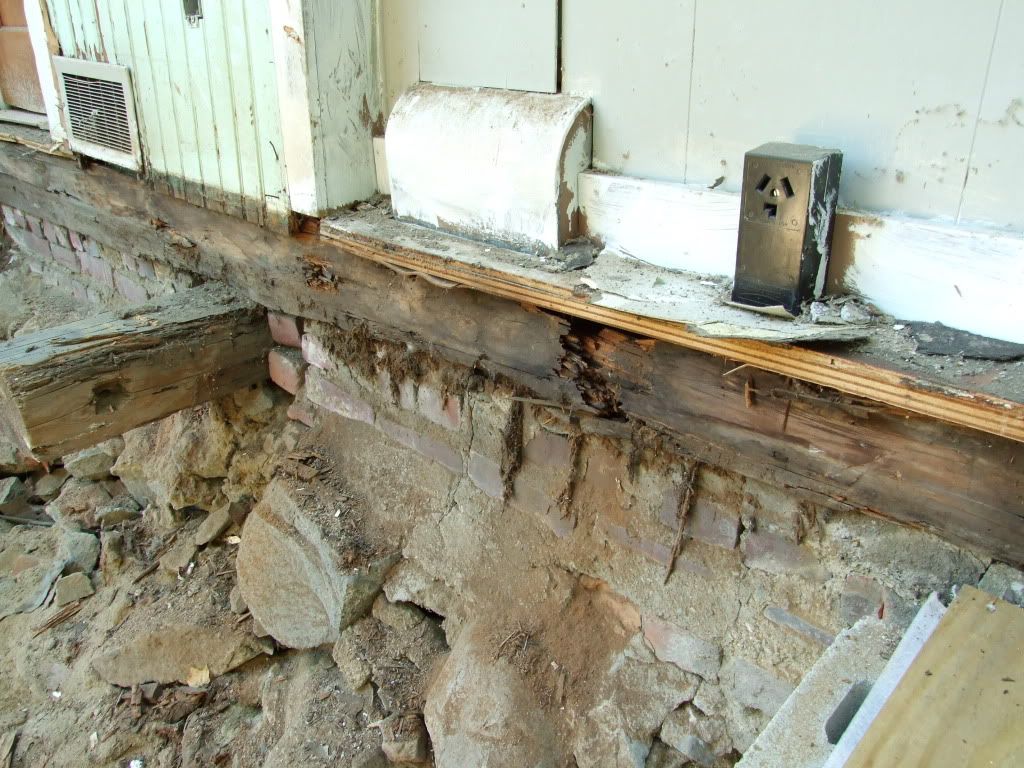
Years of poor drainage and hidden water damage have caused the support beams in the back of the house to deteriorate. The wood is literally crumbling to dust.

The sill, which is a thick beam that the entire house rests on, is rotting away.


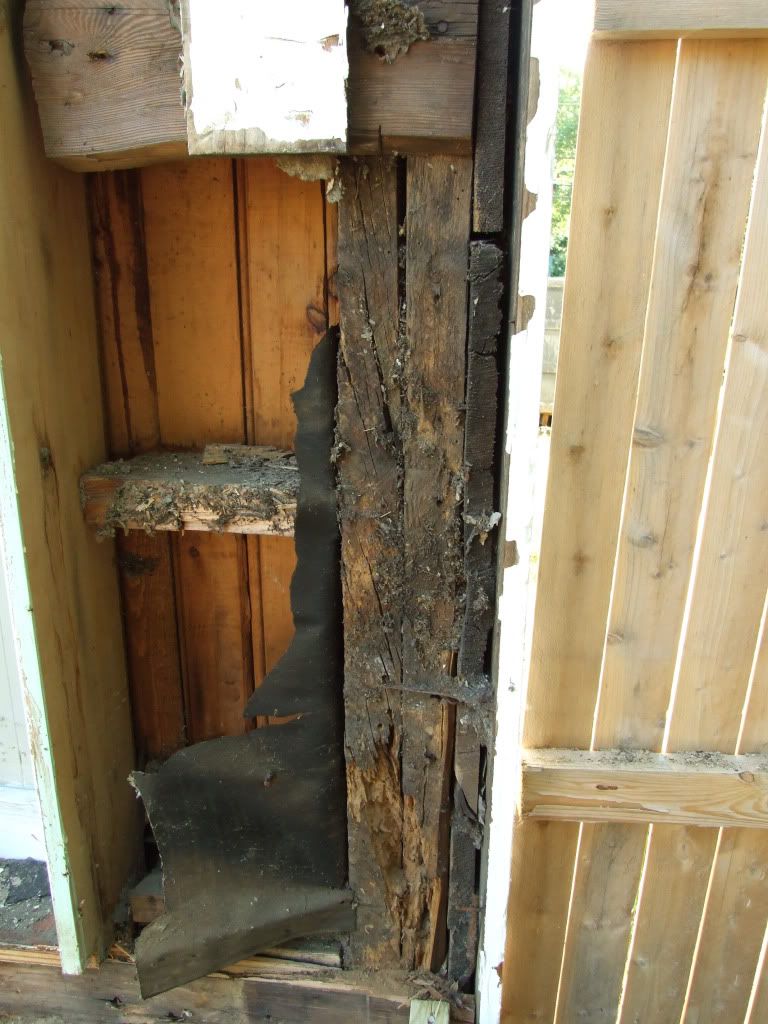
Here is a closer view of the vertical beam that supports the right corner of the house:
We were told our house could collapse. That it is unsafe and could literally fall down around us. We will need to remove the entire back of the house and replace everything. The house will be jacked up several inches so that the sill can be removed and replaced. Our contractor, who has been doing this for years and years, told us that it is the worst he has ever seen.
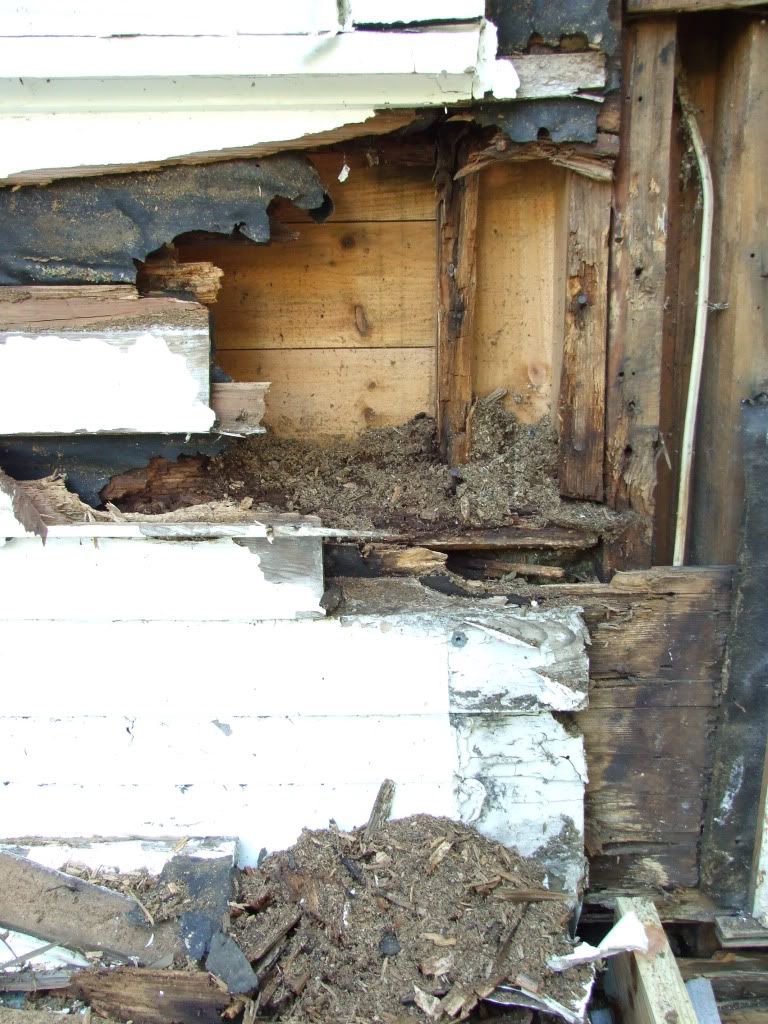
You can see more of the damage here, where the siding was removed beneath the rear window:

We don't know for sure how far across the back of the house the damage spreads, or how high up to the second floor it goes either. But given that the patio extends the full length of the house, we are all assuming that everything is going to need to be replaced from end to end.

Once we heard the extent of the damage, we instantly began looking into legal action. After speaking with lawyers, we found out that unless we could somehow prove that the previous owners knew of the problem, there was nothing that could be done. Proving that they sold the house to us knowing of the problem is near impossible. The original owner is dead and the owner’s family, who sold the house to us, did not live there.

The damage is not visible from the basement. Hell, our basement looks great! The outside of the house does not show the damage either. It was not until the siding was removed that the problem was able to be seen.

The source of the problem is the concrete patio. It was never properly graded, so water has been pooling against the house and getting trapped for years. And since it happened over a long period of time, our homeowners insurance won't cover any of it. Basically, we're royally screwed.

I feel simultaneously devastated, overwhelmed, angry, relieved, and hopeful. I know that's a lot of things to feel at once, so I'll explain. Devastated, obviously, because of the shock that something that we've put so much time and energy into is crumbling. Overwhelmed thinking of the cost (time, money, sanity) that is going to go into fixing this problem. Angry because I feel like we've been duped. Relieved because this problem was caught before our house came tumbling down. And hopeful because the one good about this whole situation is that it will give us the opportunity to make this house into the house we really want it to be.

See, since we’ll have to remove and rebuild the entire back of the house, jacking the house up to replace the bottom sill and replacing all of the supports, we have kind of a golden opportunity here. With the house opened up—and it’s not going to be opened up like this ever again—we can build outward and expand the square footage of the entire downstairs. We started making a wish list of things we’ve wished this house had, and we created a floor plan.

So that is the completely new direction that we're going in. We will expand the house backwards an additional 12 feet. The rooms in the above plan that are highlighted in yellow are new.

We will create an additional bonus/music/sitting room off of the end of the living room. We’ll have an 8 or 9-foot wide opening so the two rooms will be connected and open but still separated. This way we won’t have a 40-foot long living room. In this new bonus room we’ll install a gas fireplace (I’ve often discussed our sad lack of one in this house) and French doors to the backyard. Outside of these doors is where our new patio will eventually be built (a project we’ll likely tackle ourselves down the road).

The bonus room will be connected to a tiled mudroom, where we’ll install a coat closet (something we don’t have in the house either). It will be a great place to put Lucy’s dishes (she spills an insane amount of water on the floor when she drinks) so they will be out the way. Plus the tile will make her puddles easy to clean. This mudroom will have another door out to the backyard. There will be a covered walkway leading to this back door, so water will run off and completely away from the house.
Off of the mudroom, in the back of the house, will be a bathroom. With the expanded size, we’ll be able to install hookups for our washer and dryer and won’t need to have them in the basement. We’ll have room just for a sink, toilet, and the laundry, which will hopefully (size permitting) be behind closet doors.

Straight ahead from the mudroom will be the kitchen. This is the only part that we’re iffy on. It turns out that the existing rear wall supports too much weight from the upstairs to be moved. So we won't be able to remove much of it. Because it won't have a door in the middle any longer, though, we'll be able to extend the cabinets all along this wall, which will give us lots of prep and storage space. We may be able to fit a small breakfast bar/eat-in area as well.

The entire backyard is also going to be leveled and properly graded to ensure that no water gets trapped up against the house anywhere. Some tubes will be installed underground to help drain the water as well.

Our contractor estimates that construction will be finished by the end of October. They’ll build the addition first and then break down the exterior walls, so we won’t be left with gaping holes in the house.

We are forging ahead with this new plan on Tuesday.  It's going to be an incredibly difficult couple of months ahead, financially and emotionally. While it will be tight, I am so unbelievably thankful that we have family support to help us through it. You never know what you're going to encounter, but I'm getting a little more excited about what may lay ahead for us.

Sunday, August 14, 2011

It's happening!!!

Huge news!
The time has come for us to officially move forward with our huge kitchen renovation project!! Things are moving quickly, and our contractor begins work next Monday!

We decided to officially move forward with option number two, which I had discussed here, and are adding a half bathroom to a section of the current kitchen. We felt like this was the best move not only for convenience, but also because it will add big value back into the house. A one-bathroom, 3-bedroom house just doesn't cut it these days, after all!

So here's where we're at:
In the last couple of weeks, we got bids from three contractors and chose one to move forward with. We liked this contractor the most and his bid just happened to be about $10,000 lower than the others. Lucky! What will be a bit different about this job is that it will be two phases. The first phase will involve demolishing the mudroom off of the kitchen, building a new addition in its place, new windows, lighting, and building the half bathroom. The second phase will be installing the cabinets, countertops, hardwood floors (both in the kitchen and dining room), and finish details.

However, before any of that stuff can be done we need to demolish the entire kitchen.

Like, right off the bat. We had thought that we'd be able to keep at least some of the kitchen functioning (like our stove plugged in or some cabinets) while the addition was built, but nope. In order for the electrical to be brought up to code (with an outlet every 3 feet) every single thing in here must go from the very beginning. So, it looks like we'll be completely without a kitchen for a while. A long while.

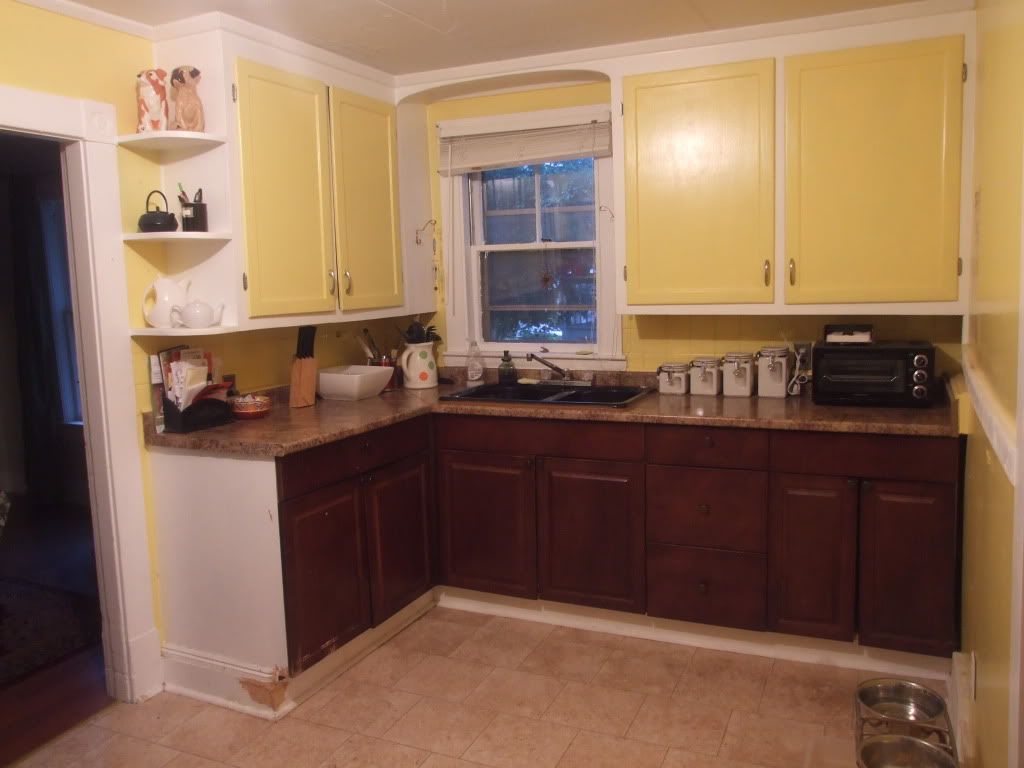
Here is one half of the (horrible, unusable, hideous, blindingly yellow, etc.) kitchen as it stands:


I don't think I need to go into detail about why we're doing this renovation! The kitchen is completely unusable in its current configuration. On the opposite end of the kitchen is the fridge, and the stove sits between two doorways to the left of this photo.

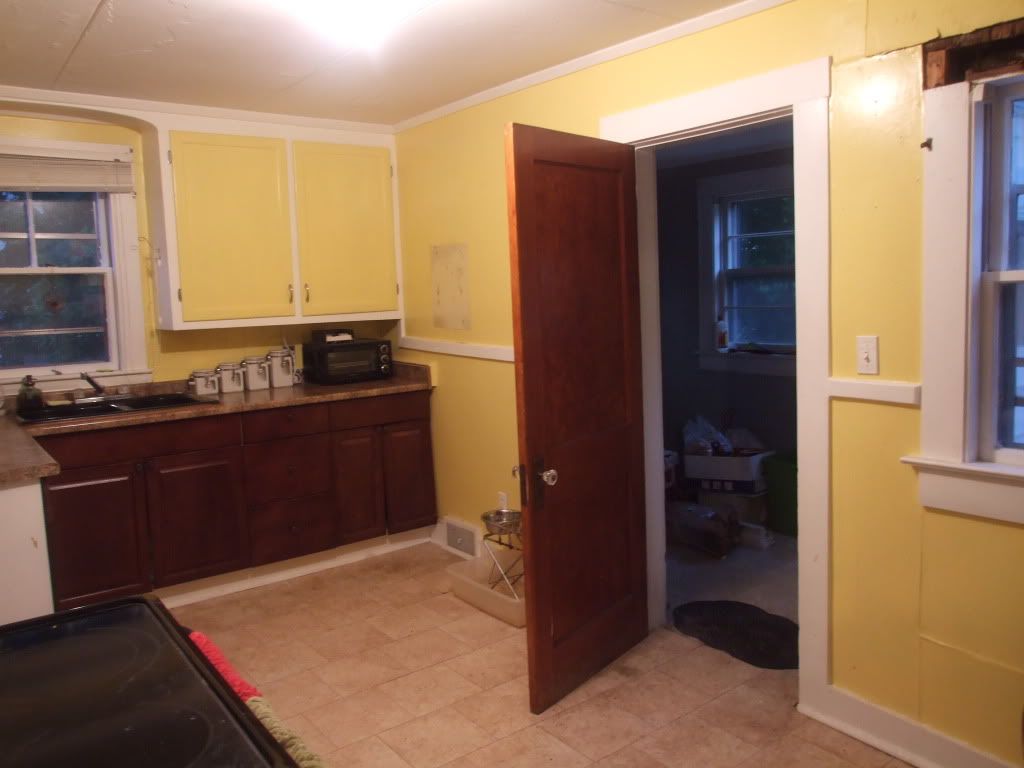
To the right is a wall between the kitchen and mudroom. (For a visual reference, check out the current floor plan here.)


This entire wall is coming down. The mudroom is also being demolished (it leaks in places and was never properly insulated). An 11' x 8' addition is going up in its place so the kitchen will be expanded. We'll put in all new windows and an exterior door to the patio.

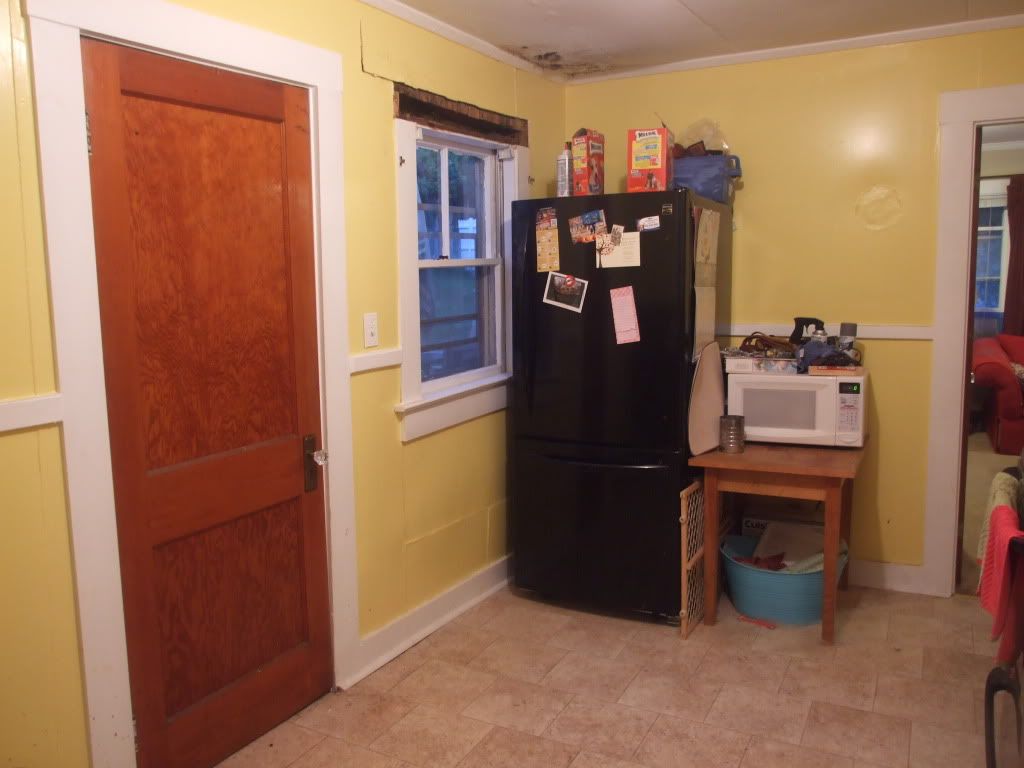
The corner to the right of the current mudroom door, where our fridge currently sits, will become the new half bathroom.


Oh, and those holes in the ceiling and window frame? Carpenter ants. We had an exterminator in and found that they had eaten away the whole window frame. Bastards! This whole window is coming out and a smaller one is going in its place to allow for some privacy in the loo.

The area where the stove currently is will essentially be a hallway to the living room. The bathroom door will be on the left, across from the existing basement door on the right.


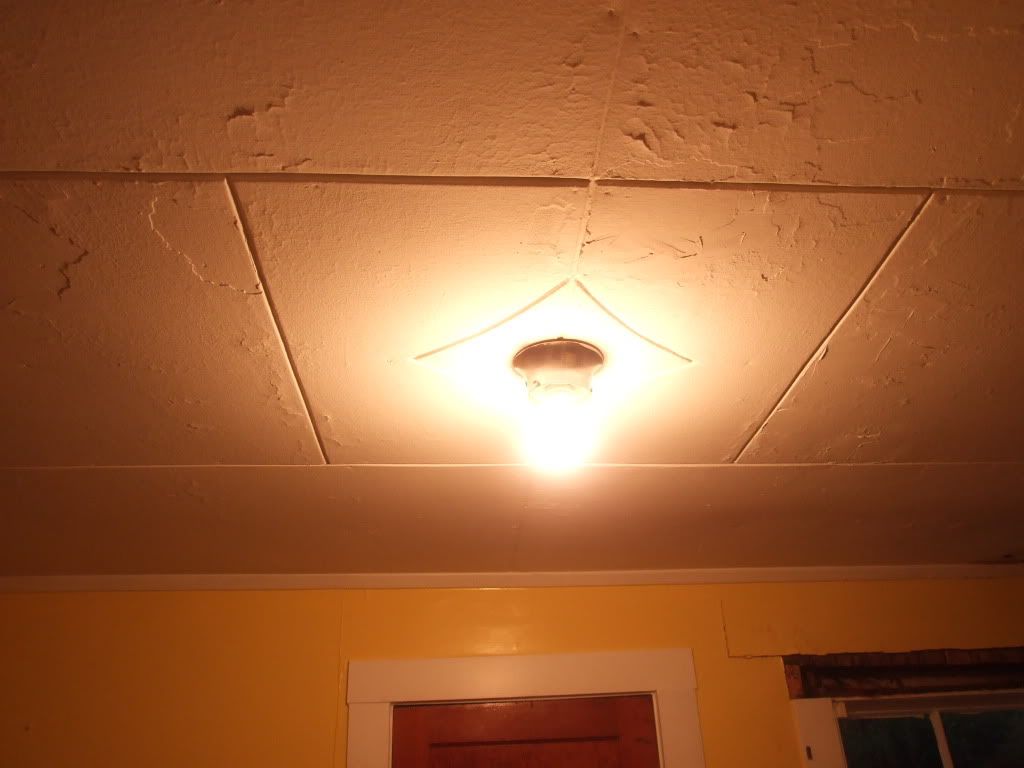
I'm so excited to get rid of the last of these crazy paneled ceilings! I can't believe that these used to be throughout the entire house. Awful.


Lighting is also going to be a huge upgrade in the kitchen. Currently, the only light in the whole room is this one exposed bulb in the ceiling. It's kiiiind of like a crack den.

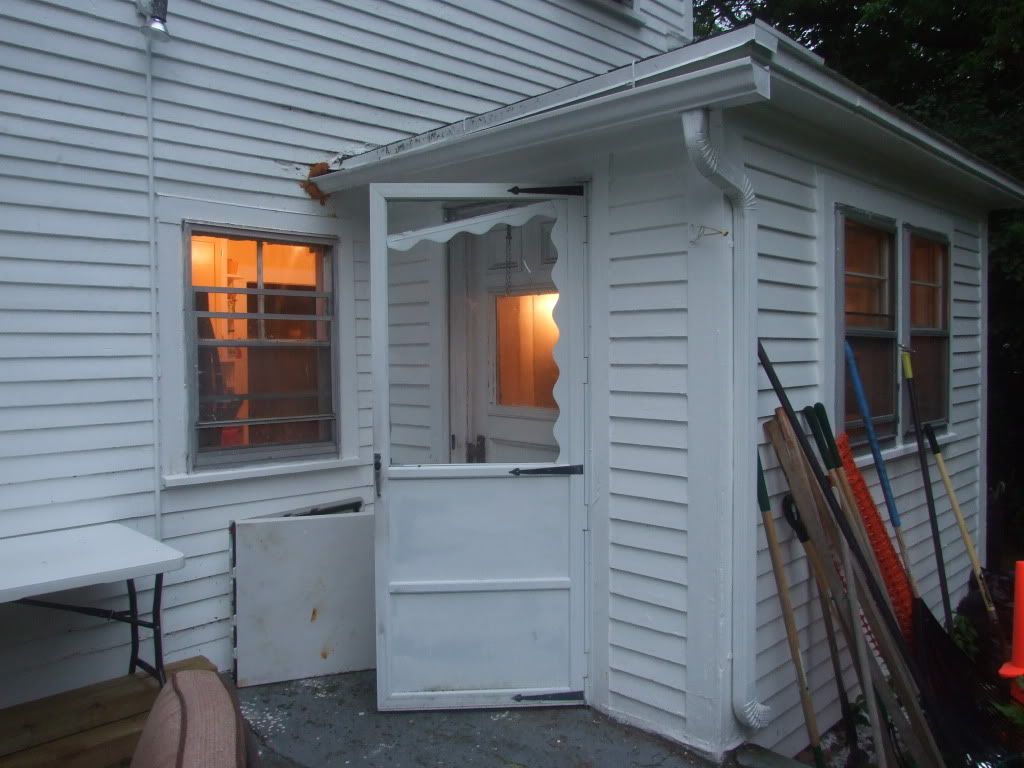
Here's an exterior view of the existing mudroom that will be taken completely down, with a slightly larger addition built in its place:


We plan on adding a glass door to let lots of light in.

So, that's where we're at. It's going to be an incredibly chaotic next couple of months! We picked up some storage bins so we can start packing all of our dishes, pots, pans, and pantry stuff in the next couple of days. We plan on plugging the fridge in the dining room, the stove will be shoved someplace collecting dust, and it will be general chaos. It's an enormous project, but it's going to be so worth it in the end!

Welcome to Lucy's House, where things get kinda crazy.

Friday, October 22, 2010

It's bathroom demolition time!!

As I speak type Branden is in our bathroom ripping down the ceiling. See, late last night he decided that since we both have the next four days off, this would be a good time to renovate the bathroom. The bathroom has been on my list of dream projects for a while, so naturally I thought this was a fantastic idea. That settled it, and off to Home Depot we went.

Our upstairs bathroom (the only one in the house) is a major eyesore, and we haven't touched it since we bought the house in June because we knew it needed a total overhaul. And, frankly, we had bigger fish to fry.

Here's the unsightly mess that we've been living with for the last 4 1/2 months:

Photobucket

Nasty. I know.

The walls are painted a bright as the center of the sun yellow, and it's some kind of super stretchy latex paint. You can actually just pull it off with your fingers and it feels like a balloon. I've never seen anything like it. (Our kitchen features the same lovely paint job, btw.) We started pulling it off in some places, and you can see that equally lovely mauve paint underneath. Barf.

On top of the beauuutiful paint job, the beadboard was never completely primed or painted. You can see where the previous owners stopped priming to the right of the toilet. Awesome.

So, here is the renovation agenda for the next four days.

First, rip down the ceiling panels.

Photobucket

These panels were originally throughout the entire house, and we already got rid of them everywhere except the kitchen and bathroom, since we knew we'd be doing bigger renovations in those rooms. We'll be replacing the ceiling with mold and mildew resistant sheet rock.

We'll also demo the equally barf-inducing robin's egg blue tile in the shower.

Photobucket

See how the tiles have already started falling off? Hopefully the demolition is a breeze. We already picked up some beautiful glass mosiac tile for the shower. We plan on bringing the tile all the way up to the ceiling for a more polished look. Neither of us have tiled before, so this will be a new adventure!

After the tiles are up (successfully, I hope!), we'll strip the latex paint off these walls and repaint.

Photobucket


So what do you think? Can we get this done in four days?? We'll find out!

Monday, September 20, 2010

Office is ready!

This weekend was nonstop. We busted ass and finally finished refinishing (say that three times fast) both my office desk and bookcase, unpacked and filed a bunch of things that needed to be stored in the office, moved in a new couch, moved out the old couch, shampooed the new couch, shampooed the living room and upstairs hallway, got a new patio set for the front porch, and still found time to take a long walk at our favorite wildlife sanctuary. After all that work, I need another weekend.

First, the desk. Branden has been painstakingly staining, varnishing, and waxing this thing to perfection.
Remember, this is what we started with?

001

Here's what we've got now, after many hours of work:

023

027

I love it. This one was definitely Branden's project, and he did such a great job getting it ready for me! What a sweet guy. :)

I picked up a fun little knob for the desk drawer for a reasonable $3.95 at a local decor shop. It reminds me of Alice in Wonderland, which is definitely why I like it. It all came together really well.

020

Next project was the bookcase. Man, what a pain this was. The surface was made of that really shiny wood veneer, and I just couldn't get anything to stick to it. Let's refresh our memories with what we started with:

008

Well, here it is now, FINALLY finished!

012

In retrospect, I think a light sanding before I primed may have helped, but I'm not even positive that it would have made a big difference. After a coat of primer and two coats of paint, the lightest tap would pull all of the paint off, right down to that damn shiny veneer. Out of ideas, I finally used some polyurethane on it, and that helped to seal everything in. The surface isn't indestructible, but it certaily has held up so far so that's a relief.

For the inside panels, I cut two of sheets of poster board to size and then hot glued fabric on to them. Once the panels were in place, I glued them to the inside of the bookcase.

022

Because the panels fit snugly to begin with, and because the shelves would add even more support, I only needed to glue around the tops and bottoms of the two panels. It was an annoyingly long project, but I'm really pleased with the result. I measured and cut wrong a couple of times, so if you were to tackle a project like this and actually measure right the first time I think it could be relatively painless. Live and learn!

The room is finally ready for me to sit here 40 hours a week. And the timing was right down to the wire, since I start working at home on Wednesday! There's still some more projects planned, like a complete closet upgrade with new shelving and added storage, window treatments, and a bulletin board.

Remember that new couch I mentioned? Here's a sneak peak...

018

Cranberry! More on that switch later!

Tuesday, September 14, 2010

Lumberjacks and telephone tables

I've neglected updating this a bit so this will be a big post. We got a ton accomplished this weekend around the house. Sunday was spent chopping down tree branches in the front and back yards. We still need to get a professional in to get down the really big branches in the front of the house (they hang over the roof into the gutters), but we were able to make some progress on some of the smaller ones.

In the backyard, the big pine tree's branches were reaching out over the roof and most of them were completely dead. So we cleaned the tree up.

Here's the best "before" I could find...

DSCF2753

Remember the giant shed we ripped down within the first week? And the overgrown rhodedendrons? Yeah, I had kind of pushed them out of my mind too.

Here's the neat and tidy after...

073

This backyard has come SO far from when we bought the house. It's so different and much more spacious. Night and day back here. The retaining wall that Branden and my brother built has held up really well. We dumped a ton of soil behind it, as well as the day lily bulbs that I pulled up from elsewhere in the yard, and they've already started sprouting behind the wall. Resilient little guys.

066

068

You can see Branden's handywork. I'm just glad it wasn't me way up on that ladder. :)

The next backyard plan is to get the fence installed in the next couple of weeks before the ground starts to freeze. Stay tuned for that!

While Branden and his dad did the tree chopping, I hung out with the dog and worked on inside projects. That bookcase that I mentioned earlier has been the bane of my existence. Despite a coat of primer and two coats of paint, it all somehow easily chips off with practically a light tap. I've taken chips off with just my fingernails accidentally tapping the surface. So I got some polyurethane to seal everything. Fingers crossed that this works, cause if not I'm out of ideas! I was about ready to toss the whole thing into a bonfire this weekend and dance around it like Maleficent's weird goblin guys in Sleeping Beauty. I'm working on adhering fabric to the back and though it's been really tough, it seems to be working. I hope to have a solid after photo to share soon because if not I'm probably just going to lose my mind.

One little project that did go a bit better was our recent Craigslist find. We came across this sweet vintage telephone table with a hidden seat (!) a couple of weeks ago and definitely had to make the drive out to snag it.

002

006

007

Secrets! I just love love love secret hidden things. It was in pretty decent shape when we got it, but needed a good refinishing, and the seat was pretty dingy and beat. That rusty looking hardware wasn't working for me either.

I primed the whole thing (it was a pain in the butt getting in all those grooves with a brush) and then Branden spray painted. Some primer, a few coats of spray paint, and new hardware and we came out with this:

029a

043

060

044

I love it! The table now lives in that previously puzzling blank spot next to our television. Not sure if this will be its permanent home, but for now it works. I recovered the seat with some remnant fabric we had. It's actually leftover fabric that Branden used inside the cases at his jewelry store. It's not quite right (too pink) but for now it works.

Solid project, right? Well... umm, right after the last coat of spray paint, Branden asked me to hold the table up while he sprayed underneath. Somehow I let the whole thing topple over (it's really top heavy!) and smash onto the patio. So now there's this teensy weensy chunk missing off the top...

061

Whoops. Stay tuned for a post on how to fix chipped wood! This is why I'm not to be trusted with important jobs, people. I know this. It's also why I didn't try to be a lumberjack and stayed inside, far away from ladders and saws and sharp things. I know my limits.

Monday, May 10, 2010

Welcome to Lucy's House!


We bought our first house!!

It's a 1920, 2-story bungalow in seacoast Dover, New Hampshire -- our first real home. Coming from countless apartments in various towns for years, we're excited to be planting some permanent roots. And with our 95-pound (and still growing!) Saint Bernard puppy Lucy, we needed to give her some major room to roam.

In apartments, we've never had the freedom to paint, nevermind renovate, and have had to just live with whatever the place is like, regardless of style or function. But no more! Now, as makers of our own destinies, we are free to transform our 1,500 square foot "character home" into what ever we want. No more living with ugly paint colors, unusable kitchen layouts, dingy floors, and old bathroom fixtures!

I thought I would create this blog to document our struggles and (hopefully) victories when it comes to decorating and remodeling our very first home on a limited budget.

Here is our (ambitious) game plan for the house:

INTERIOR:
-Strip wallpaper throughout the house and paint -- the old, dingy wallpaper is a theme that runs through most of the house and hasn't been changed in probably 50 years. After the paper is off, we'll likely have to do lots of patching, sanding, priming, and finally painting.

-Major kitchen renovation -- this will be a major investment and likely the biggest project that we take on. Our plan involves knocking down the wall between the kitchen and dining room, opening it up into one big space. Then we'll add a breakfast bar, new cabinets, countertops, lighting, and hardwood floors, and install a dishwasher (!!!), since the kitchen currently doesn't have one.

-Reroute washer hookup -- the washing machine is currently hooked up in the basement, but the dryer hookup is in the mudroom off of the kitchen. Don't ask me why! We plan on redirecting the plumbing so that the washer can claim its rightful place in the first floor mudroom.

-Refinish upstairs hardwood floors -- the three upstairs bedrooms have original hardwood floors, but they've seen better days. All they need is some refinishing and they'll shine again.

-Add a half bathroom -- our second biggest renovation would involve adding a half bathroom on the first floor. By expanding the kitchen/dining area, there will be a perfect spot left over to add the bathroom. The only bathroom is currently on the second floor, so adding a half bath will increase the home's value and be super convenient!

EXTERIOR:
-Fence in the backyard -- this is priority #1. Lucy needs a safe place to roam, bark, and eat sticks. We plan on completing the backyard fencing before we even move in our furniture. Plus, we'll be adding a kiddie pool in a nice shady spot for Lucy to cool down this summer, so stay tuned for that.

-Replace patio -- the current patio is poured concrete, and it's in rough shape. Our plan is to build a wooden platform deck over the existing concrete slab. Nothing too big, so we can maximize the green space, but big enough to fit a table and chairs and a grill.

-Remove or re-purpose oversized shed -- the existing backyard shed is about twice the size of our detached garage. It's a monster! One idea is to remove it completely to free up some more yard space. The other idea is to open it up into a covered patio space.


This "laundry list" is just the start of our plans, and I'm sure that things will change once we get in and start living in the house. It's a huge amount of work to take on, but we plan on picking away at everything one piece at a time, and keeping this blog up to date while we do it!