Thursday, June 24, 2010

Ladies and gentlemen, the color has landed

The living room and dining room have been painted and I couldn't be more thrilled with the way the colors came out. They are just beautiful! Very sophisticated, modern tones. And everything looks so clean! I'm in love!

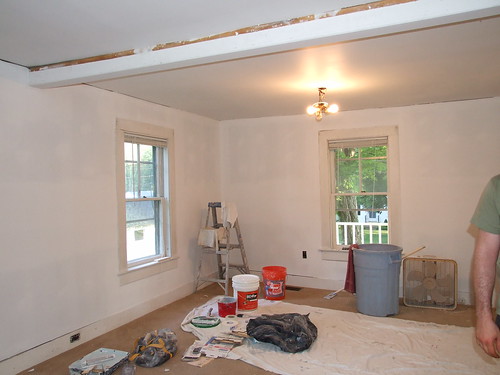
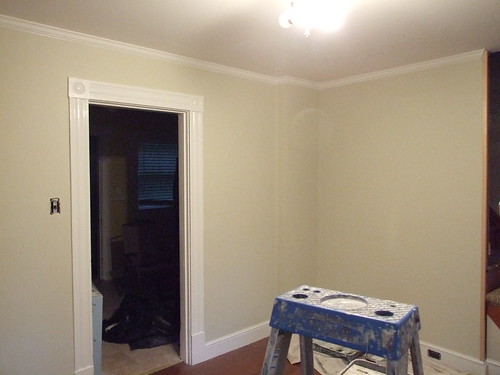
The light in the house was being tricky (a storm soon rolled in that brought hail along with it!), so it was tough to get pictures that accurately reflect the color. It looks a wee bit different in person. Anyway, here's the living room:
075

074

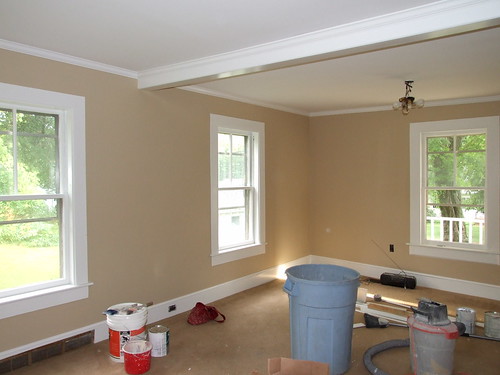
The crown molding is all installed and it looks fantastic! The trim has been painted as well and the crisp clean white really gave the whole place a much-needed face lift.

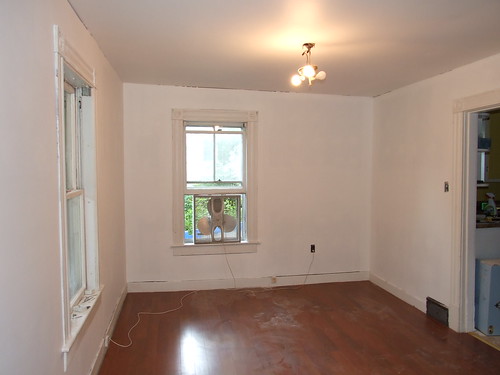
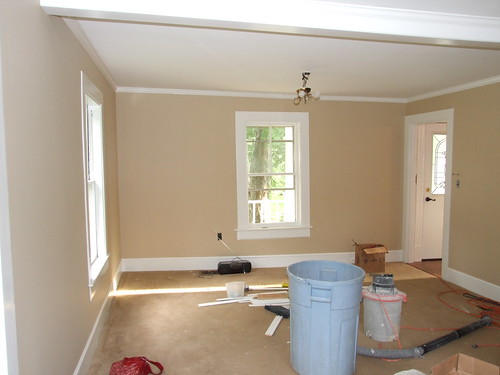
The dining room color was even tougher to capture on camera, but I did the best I could in the middle of a crazy thunderstorm.
050

049
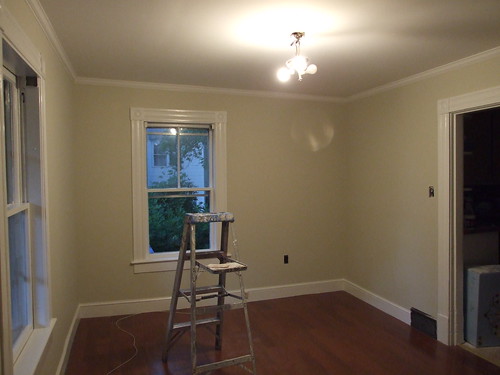
It's a bit lighter than this in person, but you get the idea. Can't wait to see the chandelier in place!

I especially love the way that the two colors flow from room to room. It's something that we really took into consideration when planning the color scheme for the house and it turned out great. Here's looking from the living room into the dining room:
071


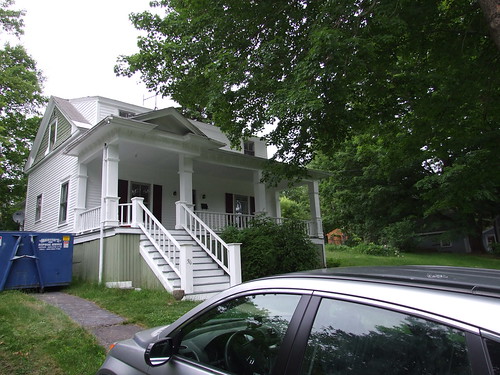
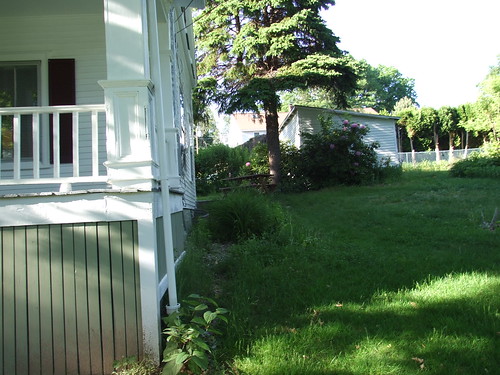
We stepped out to watch our first thunderstorm from the porch.
061
This storm was crazy! On the drive back to the apartment it looked like a tornado had ripped through town, with downed strees and power lines everywhere.

Just a couple of days now until we move in. I can't wait to see the rest of the colors in the house!!

Saturday, June 19, 2010

Primed and ready

Lots of progress around Lucy's house the past few days! I'll just cut to the chase. And by chase, I mean pictures.

The dining room and living room have been been sanded and primed! They're ready for paint and crown molding and then they'll be finished!! Wow, that sentence seems so impossible. But it's true!

Here's the living room in all its clean, white glory:
009

010

We've decided not to reinstall the china cabinet in the corner above. Once we got it out it really opened the room up. And I was never a huge fan of the design anyway. It was very outdated. Plus, it had been added later (probably in the 70s or 80s) and was made of crappy particle board. So, off to the dumpster it goes!


011
The dining room is looking great. I can't wait to see our new chandelier installed.

I think the biggest transformation so far is the office upstairs. This room looks so complete already and it's only been primed! It's SO much cleaner and brighter:
013


The guest bedroom walls are all up now and it's ready for primer as well:
015


The master is getting there, with just one more wall to complete.
018


So those are the big changes on the inside. We're definitely coming along! Everything is projected to be finished by Friday, so we're less than a week away from completion! It doesn't even seem possible that the house can look so great given what we started with. Can't wait to see the paint colors!

The yard is making progress too. Branden and our friend Josh spent last night cutting up the shed roof into pieces and hauling them to the dumpster.
002

021

It's tough to tell now with all the debris, but getting that shed down really has opened the yard up a ton!

I'm off to Florida until Wednesday, but I'll hopefully have tons of progress to share when I get back. The downstairs should probably be completely finished by then. Can't wait!!

Thursday, June 17, 2010

The palette unveiled

Work is coming along really nicely at the house. Our contractor expects to be finished with every room painted and primed by the end of next week! I'm so psyched to have everything done by the time we move in next Sunday. Such a relief.

So since the walls and ceilings are almost all up, it was finally time to stop overanalyzing and going back and forth on everything and finally just pull the trigger and pick the paint colors! Unfortunately, as a through-and-through Gemini this was nearly impossible for me. Because every time I picked a color I liked I just had this terrible nagging feeling about if there was some other color that would really work better. Luckily, Branden is super focused and really good at reigning me in and forcing me to make decisions! Thank god somebody can do that around here.

Anyway, without further ado, here is the palette we chose, all from Benjamin Moore. Keep in mind that online swatches look very different than in person, so these aren't going to look exact. But they'll give an idea of the overall feel of the colors we chose!

The living room will be Shaker Beige. We moved away from anything with green tones and went for something warmer and more neutral:


Dining room will be Natural Elements. We'll also use this color on the stairwell (which opens into the dining room) and the upstairs hallway:


Upstairs, we'll have Silvery Blue in the master bedroom. This color is much more gray than it's showing on my computer screen. The bedroom will be a blue, chocolate brown, and cream color scheme:


The guest bedroom will be a bit darker, in Fieldstone:


Last, the office will be Beach Haven and will eventually get a cream, chocolate brown, and green color scheme:


Seeing all of the colors together, I think it's going to give the whole house a really cohesive color palette. And with the crisp white trim and crown molding in each room, it's all going to look clean and fresh. I'm really relieved that the decision is over and I'm really happy with it. I can't wait to see it done!

Monday, June 14, 2010

Tetanus anyone? Yes, please!

So a few days ago when I first posted about our plans to dismantle our backyard shed, I jokingly said that I would be staying out of the way to avoid any trips to the emergency room. Har har har, I laughed. Because it was a joke. Of course we wouldn't be going to the hospital! It would all be fine! Piece of cake! Well.

After hours of Branden and his father attacking the shed's surprisingly solid frame with sledgehammers, sawzall, ropes, pulleys, and brute force, the behemoth finally came down.

Here's Branden sawing into the last standing side:
003

The roof, finally almost down:
005


007
This picture was taken just shortly before they victoriously collapsed the whole thing into a big pile of wood scraps.

I don't have any pictures of it completely down because this is right about the time that Branden got a nail through his foot. He continues working, mind you, until the shed is completely collapsed, saying that he's fine and we can just go to the ER after it's done.

So once the job was done we headed over to the hospital:
009

They decided to take an x-ray and found that a half-inch piece of the nail had broken off and was lodged inside his foot. So while he continued to swing a sledgehammer into a shed wall, he had a half inch of rusty tetanus-and-mouse-pee-infested nail inside his foot. We had been at the ER for over an hour, and waiting for anesthesia would take at least another hour, so in his infinite wisdom he told the nurse to just go ahead and remove it right then. Being too impatient to wait, and because he's a freak who doesn't feel pain, he had them cut his foot open and pull the nail out without any local anesthesia. They gave him a tetanus booster and a band-aid and we were on our way.

Side note: emergency rooms are very strange places. I know it's unfair to generalize, but the trashiest people were in there. There was yelling, crying, limping, and all around it was kind of a freakshow. Entertaining though.

Weekend Tally
Sheds dismantled: 1
Trips to the hospital: 1

All in all, I'd call it a wash.

Saturday, June 12, 2010

Goodbye jungle, hello freshly cut grass

Yesterday we (and by we I mean Branden) finally got to cutting the grass with our hand-me-down lawnmower. After some tuning up it did the job, and the grass no longer comes up to my knees so I count that as a major success. Our house was dangerously close to starting to look like the eyesore in the neighborhood.

Here's Branden in action while I cheered him on from the front porch:
010

So much better!
014


Everything else is moving along nicely. The ceilings were ripped down in all of the bedrooms upstairs and the new ceilings are all installed now. Most of the paneling has been taken down too. And I'll give you one guess as to what was underneath the paneling. Oh yes. More wallpaper! These people were wallpaper junkies.

Here's the new ceiling in the master bedroom. You can see where most of the paneling has been taken off of the left hand wall and exposed the beige wallpaper underneath:
002

Here's the new ceiling in the second bedroom:
004


Most of the walls should go up on Monday upstairs. I'm still not sure how they're going to tackle the stairwell, but that's why we leave these things to professionals. :) Tomorrow the shed comes down, so stay tuned for those updates!

Friday, June 11, 2010

On the menu for this weekend: more demolition!

Our house is on a quarter-acre lot. Most of the yard space is on the front and right side of the house. Along with lots of storage space in the basement, there is also a detached garage and a gigantic shed in the back. The shed is about double the size of the average shed but curiously only has a single door, not the double barn doors that could accommodate a lawn mower or other equipment.

We have no idea what this could have been built for. Given the patch-it-instead-of-fix-it-right-the-first-time technique found throughout the house, I highly doubt it was a workshop. I don't get the impression that anyone handy lived here. Ever. Perhaps a chicken coop? Studio? Place to stash the dead bodies? Evil scientist's lair?

Here's the shed in question:
DSCF2747
See how huge it is compared to Branden? There's no need, people.

DSCF2753
DSCF2751


H-U-G-E. It takes up a massive chunk of the backyard. And that is yard space that a certain jumbo pooch would love to have to frolick in, eat sticks, and poop on.
Enter the rented dumpster:
001

Since we've got that bad boy just until the middle of next week, we figured we should fill 'er up. The plan is to cut into the shed and rip it all down on Sunday (with help!). I will probably be hanging out with the pup, maybe sanding and painting that cruddy picnic table and benches you can see in second picture of the shed. Or weeding and trimming hedges. Or daydreaming. What I mean to say is, I'll be finding other ways to be helpful while completely avoiding taking down a large-ish structure with sledgehammers and saws or carting the rusty nail-encrusted pieces to the dumpster. Since I find new ways to accidentally hurt myself every day, this project is a trip to the ER just waiting to happen for me. No thanks!

Here it is from the front of the house, looking up the side of the yard:
DSCF2782

That will be just green space once the shed is down. I can't wait to see how much it will open up the yard when it's gone. Fingers crossed for no major (or minor) injuries!

Thursday, June 10, 2010

Progress! And, another change of plans.

We're getting there! Here's the living room with its brand new ceiling and walls:

003


The room feels so much bigger without the strange ceiling panels that were there before. It's really a huge improvement. Now picture it with the crown molding installed, the cabinet back in place in the corner, and some beautiful color on the walls, and we've got ourselves a real room!

Speaking of colors, I'm really leaning towards Martha Stewart's "Tobacco Leaf" paint color for this room. Here's the swatch:


It's a brownish/grayish/greenish earthy tone that I think could really pop against the white trim in the living room. This online swatch makes it look a little more gray/mauve than it looks in person. Who knows what kind of tones it will have in different kinds of light, though.


We do need to commit to paint colors very soon, as our contractor will be priming and painting the living room, stairwell, master bedroom, and all ceilings. Maybe some other rooms depending on the schedule. So we have to at least pick those out and the rest we can pick away at piece by piece.

The contractor ran into a snag with the dining room ceiling this week, which apparently needed to be completely restrapped. The beams were crooked and sagging, so he needed to redo everything to make sure the ceiling is strong enough to hold the sheetrock and is level. That set us back a bit in the timeline, so we're now actually going to be moving in at the end of June instead of this weekend. I'm a little relieved (though it meant switching around a vacation) and it is definitely the right move to wait until major construction is done before moving our stuff in. Luckily our current landlord is super flexible, so we're able to stick around here while our contractor is hard at work on the house. It's a little tough to be patient, but I know it'll be well worth the wait.

The dining room ceiling and walls are up now:

006

Last night we picked up a new chandelier at Home Depot for the dining room. It just happened to be the least expensive and the one that we liked most. Imagine that.

I'm pretty stumped on paint colors for the dining room. I'm thinking something pretty neutral, like a putty or a cream, will help the room flow into the living room. Gah! What to do?

Tuesday, June 8, 2010

On to Plan B...

There are many things in life that are better left to professionals. Like training orcas. Or servicing a space shuttle. Or flying an airplane full of babies and kittens through a railroad tunnel. One more thing that I will now add to that list: replacing walls and ceilings in a 100-year-old house.

This weekend we brought a contractor in to take a look at what exactly we were dealing with on these walls. Cause we have no clue. Much to our surprise, the drywall-looking material underneath the seven layers of wallpaper in the living room (which we'd already spent about 25 hours steaming and scraping off) was not actually the bottom layer of the wall at all. It was a very thin layer of gypsum board, about a quarter of an inch thick. And underneath that gypsum was another four or five layers of wallpaper, the last of which was actually newspaper pages from a 1921 edition of the Boston Post. (We found the front page of the "Sporting Section" with the date and a headline about the Yankees preparing to open their new ballfield in Gotham… Yankee Stadium. Though I'm a born Sox fan, it was still cool to see that little bit of history built into the walls of my house.)

Here are some shots of the newspaper scraps:

Anyway, underneath all those layers of wallpaper and newspaper was solid wood beadboard. Surprises abound!
At this point, our contractor advises that the best thing to do is to rip all of the gypsum down and drywall the entire house. While we're at it, we're ripping out the weird ceiling panels that nobody has ever seen before and installing nice, flat, modern sheet rock. So right now our house is being gutted, from bottom to top, and completely modernized with brand-spanking-new ceilings and walls. It's going to feel like a completely different (and livable!) house when it's finished.

The dining room ceiling and walls are all down now:
And the new ceiling is partially up in the living room:

This alone has made a huuuge difference in that room. The ceilings feel so much higher!

I couldn't be happier about having professionals doing this work. It would literally have taken us years upon years to get the house to where they'll be able to get it in just a matter of weeks. Move in day is Sunday, so it looks like we'll at least have most of the construction done in the downstairs by then!

Saturday, June 5, 2010

Ohhhh no we didn't.

I meant to update this earlier, but after we closed on June 1 we got right to work on the house and have been swamped since. Let me make this very clear: stripping wallpaper is the absolute worst, most tedious, and terrifying thing ever.

Here is the living room (and the big pup!) before we started working:


And here is the living room after about 10 to 15 hours of stripping back SEVEN layers of wallpaper:


It looks like a war zone. Remember those horrible, heart-wrenching photos of the insides of destroyed houses in New Orleans after Hurricane Katrina? Yup. That's what our house looks like to me.

Stripping 100 years of wallpaper (many layers of which have been adhered with actual glue that doesn't come off with those removal chemicals) is not an easy feat, as you can probably imagine. We have learned some tricks, though, that have made it a teeeeny bit easier. Allow me to share, should anyone reading this ever find themselves in the same horrible situation:

1. Get a wallpaper steamer.
We started by renting one at Taylor Rental for $28 a day. We weren't sure if it would be worth it or not, so we figured we'd rent one first and try it out. It definitely helps, and the steam penetrates most of the layers to allow for scraping. We decided to buy our own, for just under $100 at Lowes, since EVERY SINGLE ROOM in our house has 100 years of wallpaper to remove, and spending nearly 30 bucks a day just didn't make economical sense.
The steamer we got was the Wagner 905 Power Steamer. It's the little yellow vacuum-looking thingy in the second picture above. It doesn't hold as much water as the one we rented, but it still does the job.

2. Vinegar actually works.
Spraying a mixture of water and vinegar on the walls has been the most effective "chemical" treatment we've found so far. We tried DIP, that didn't work. The vinegar does smell strong, so you'll want to keep windows open. Also, if you have a dog that's anything like Lucy and will eat everything in sight, you should keep them away. Lucy licked the vinegar off the walls. Gross. Use a wallpaper scorer to puncture the paper (it likely won't penetrate all 60 million layers of paper that seem to be on your wall, but it will get through the first few) and spray the vinegar mix. Let it sit for a minute, then hit it with the steamer. Scrape the layers off with the putty knife.

If you're as lucky as we are, right about now in the process you'll discover that underneath layer #3, there is a thin layer of plaster from when some previous owner decided to plaster over the walls and then apply more wallpaper in an effort to patch problem areas. This will enrage you but it is important to not burn your new house down just yet. Instead, pick away at the plaster layer with your putty knife, and keep scraping.

Once all the paper is off completely (at this rate, we have no idea when that will be) we'll need to skim coat the entire walls, floor to ceiling, with a thin layer of plaster. There are a ton of cracks, crevices, and other imperfections in the drywall from being so old. We'll need to skim coat the walls to smooth them out (at least one coat, maybe two), sand the plaster down, and then prime and paint.

Our goal is to have the living room primed by the time we move in next Sunday. I honestly don't see how it's going to happen. We'll be there all day tomorrow (our brand new appliances are being delivered tomorrow morning!!) so hopefully we can bust out a ton of this shit and get closer to it looking like a real room and not a disaster area!

The amount of (seemingly) endless work ahead of us is kind of a depressing thought, sooo I'm going to end this post on a happier note: